Spring Hard Red Wheat, Root Vegetable Ravioli

Hard red wheat is the workhorse of the flour world. This is the main type of wheat in general commercial all-purpose flour. 95% of the wheat grown in Kansas is hard red (winter) wheat. In contrast, the wheat region of Washington (my homeland) grows more soft white wheat.

For this batch of pasta, I was using spring hard red (grown in the northern plains with a shorter growing season), which has a higher protein content than its winter sibling. It may have been a little bit of a hearty overkill, but my idea was to make a rustic high extraction (near whole wheat-type) pasta.

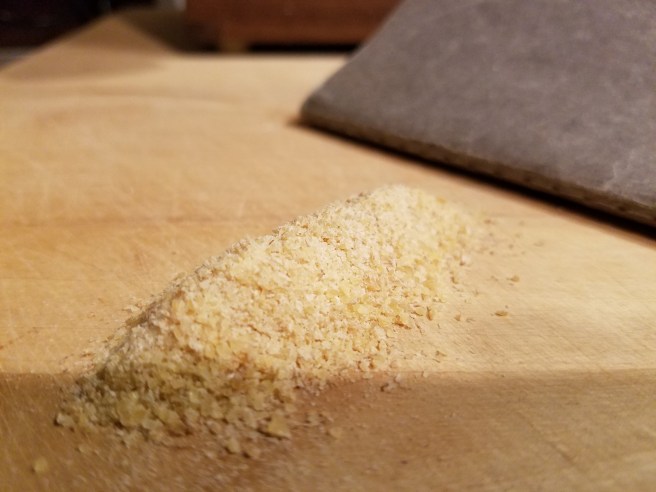
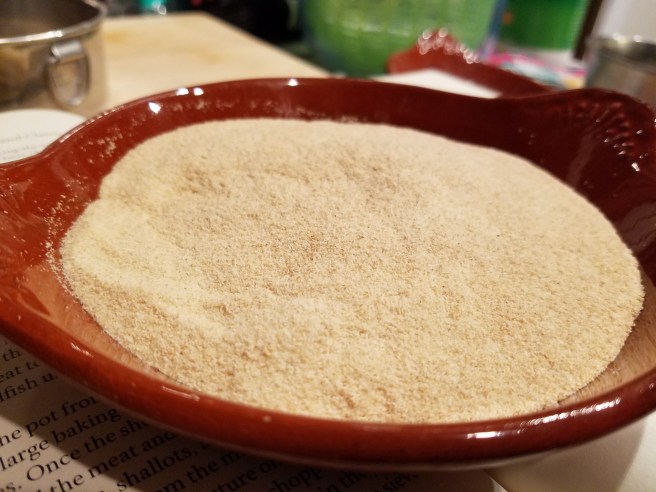
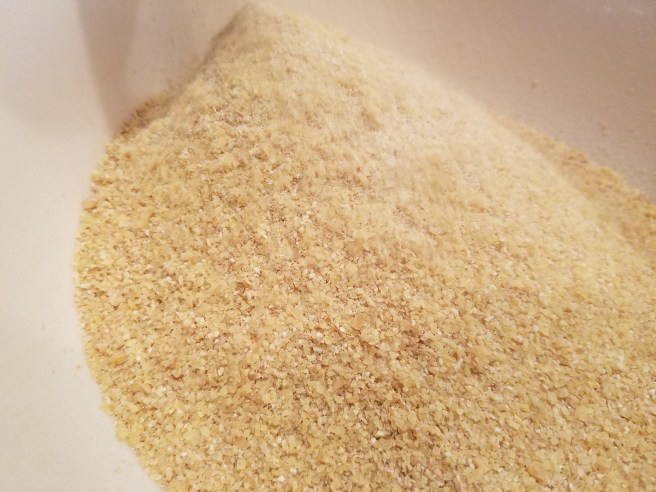
I had actually milled and bolted the flour a week earlier, leaving it as straight flour (bran and germ removed) in the fridge until I had time to put it to use. The extraction rate for this straight flour was disappointing though, coming out a little low at 60% of the whole berry using the #40 mesh sieve. 70-75% would be the ideal range, although I don’t generally get that high. I think that is more the result from high efficiency roller mills. I will have to see what happens with the next batches, but I am worried that my mill needs some maintenance.

IMG_20191026_160309

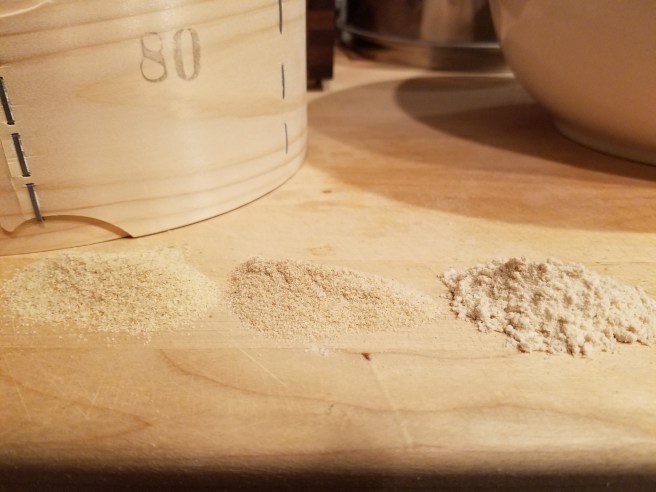
Originally, this pasta was going to be made with 100% straight flour, but once I started working with it I felt it was too rough. Instead the final flour make-up was 200g of the straight flour and 100g of fine flour. The fine flour was just the same straight flour passed through my #80 mesh sieve. I find the #80 mesh to be the lowest grade that produces a soft flour approaching general all-purpose texture and properties.

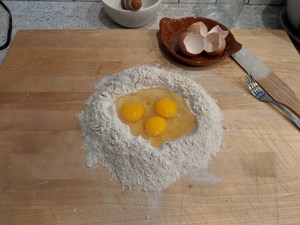
For the dough, I added a sprinkling of sea salt to the flour and added three whole eggs to the center flour well. I should have used four eggs (or probably just an extra yolk), as this flour was a little dry and fresh milled flour usually needs more liquid. Instead though, I ended up with a good amount of flour that didn’t get incorporated into the dough. I wasn’t worried though as I didn’t need that many ravioli for just a small family dinner.

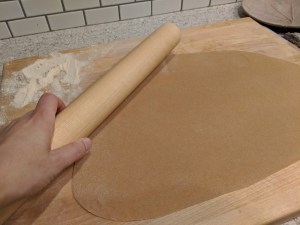
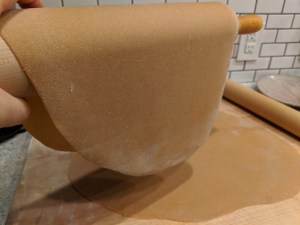
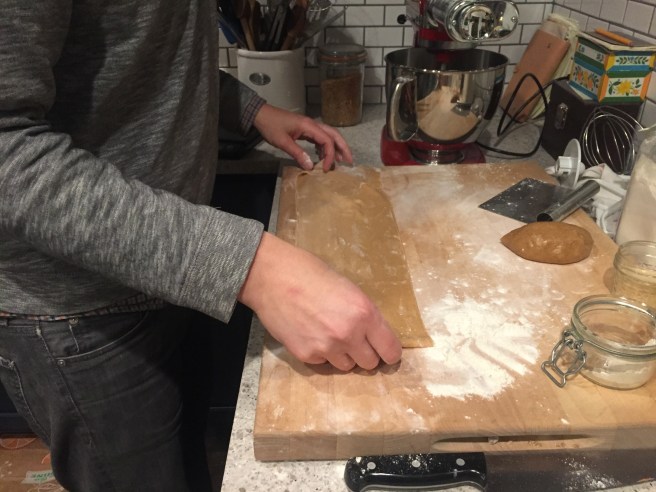
The dough was a little on the tough side (strong spring wheat gluten), but still rolled out smooth and even with an overall nice feel. A stuffed pasta dough does need to be tougher than a dough for noodles. After resting the dough, I hand rolled and cut it into 3 inches strips.

The ravioli filling was roasted root vegetables (potatoes, carrots, celery root, and turnip), well smashed up and mixed into ricotta, Parmesan Reggiano, parsley, olive oil, lemon juice, and fresh sage.

IMG_20191026_195558

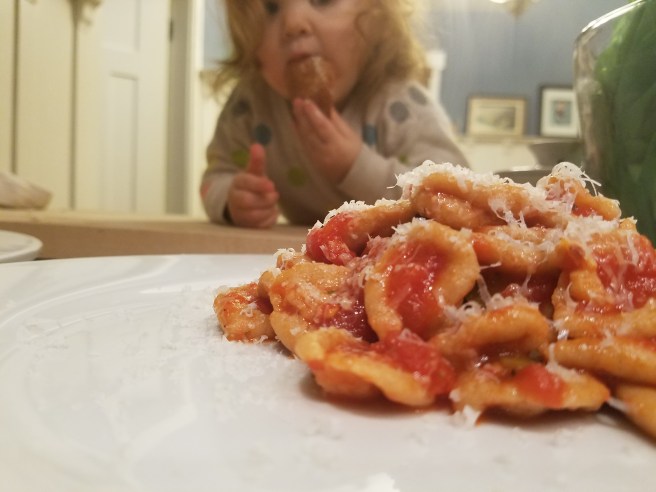
They didn’t come out beautiful, but they are the best ravioli that I have made before, as far as being a consistent size and well formed.

IMG_20191026_200901

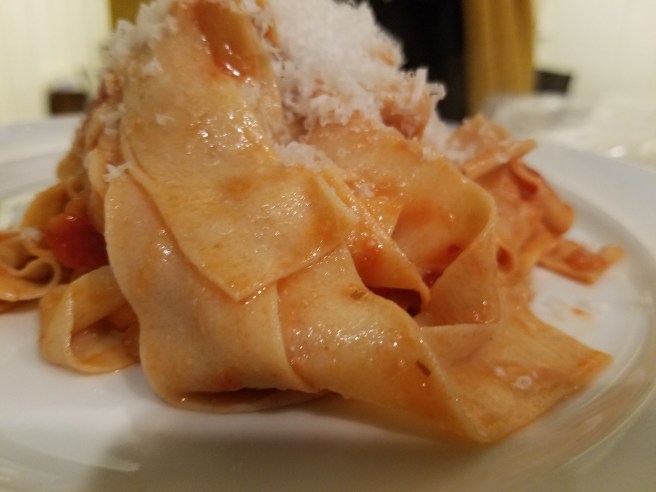
The final dish was pretty tasty, in my opinion. The pasta was a bit “wheaty.” My daughter didn’t seem to be a huge fan, but she ate maybe one ravioli after I pulled one from the bottom of the dish that didn’t have any chopped parsley on it (a small victory). I was worried that the rustic pasta would be too hearty for the subtle flavors of the root vegetables, but it carried the flavors well.

The finished dish was made by rendering down a little pancetta, frying some sage leaves in the fat, then giving the ravioli a toss in some of fat and butter, and lastly adding in the remainder of the roasted root vegetables and tossing the pancetta and sage leaves back in the pan. Drizzled with a finishing olive oil, grated Parmesan Reggiano and chopped parsley to top it off.

IMG_20191026_202045

Ancient Grain, Einkorn, and Pizza w/ Kids

While it remains my opinion that you can’t make great pizza at home (without an elaborate setup), you can make good pizza if you stick with what works for your kitchen. For me, that is cast iron skillet and sheet pan pizza. All the more reason to highlight good dough and that starts with good flour.

I considered making a 00 type flour using my #120 mesh sieve, but decided it was just a bit of an overkill for having pizza with friends and kids. By chance, the next week a different group of friends happened to have a discussion on whether 00 flour was better for making pizza. The consensus was that they didn’t really like it, as it wasn’t very tasty and felt it made too flat a crust. I found that a little surprising, but looking into it later learned that King Arthur makes a 00 “Italian” flour that is low protein, which may have been what they used. For commercial OO flour, Caputo is the gold standard with 12.5% protein content, contrasted with 8.5% for the King Arthur (way too low).

Milling a Hard Red and Einkorn Blend

For this pizza party, I decided on making a blended flour from hard red spring wheat and einkorn. Einkorn is an ancient grain, possibly the oldest, that produces a sweet nutty flour with a soft yellow color. Alone it doesn’t have the best dough (rheological) properties, as it has a weak gluten, but it adds good flavor. This type of pressed-to-form pizza also doesn’t require as much of a purely great stretchy dough as with a hand tossed pizza.

My end goal for this milling project was 350 grams of a fine flour blend, 2 parts hard red to 1 part einkorn. I enlisted my daughter’s help. She likes to play with the bran when I make flour. It actually makes a good play food. You can only make so many bran muffins, so most goes to waste anyway.

img_20190127_112220
milling is loud

Starting from 600 grams of hard red and 400 grams of einkorn, I bolted the whole grain flour down to 240 grams of fine red wheat flour and 110 grams of fine einkorn flour. This batch of hard red was noticeably dry and didn’t mill the best. Einkorn is also fairly low yield when bolted, a downside to using unmodified ancient grains.

The flour grades for my home mill are:

  • straight, removal of largely just the bran with a #40 mesh sieve.
  • fine, using a #80 sieve, this is the minimum quality I like to work with for a good clean tasting dough (i.e. not too whole wheaty).
  • superfine, soft powder (00 type) flour, but not a labor of love to get the flour through a #120 mesh sieve and also requires starting from a much larger weight of wheat berries (e.g., a hard red superfine is a 20-25% extraction flour).
  • class b, what is left between fine and superfine (good for crackers).
  • middlings, what is left between fine and straight.

I am thinking of adding a #100 mesh sieve to my collection in order to get flour that is closer to superfine, but easier to produce.

Making the Dough

I used a recipe for same-day pizza dough from Ken Forkish’s Flour Water Salt Yeast, but I went a little heavy on the yeast. Fresh milled flour also tends to needs more water. It can really absorb a lot more liquid. This flour just required a little more to get to what I thought would be equivalent for this recipe (recipe of 70% hydration to 75%).

img_20190127_124137

img_20190127_124147
flour and water just relaxing, autolyse
img_20190127_153213
mix being folded
img_20190127_162309
dough all formed-up

The final pizzas turned out really nice. I even made true caramelized onions for the occasion. For the sheet pan pizza, a trick I came up with last time was to carefully transfer it to a cooling rack and put it back in the oven to fully crisp the bottom. Otherwise the middle stays a bit soft.

The cast iron skillet pizza was designated as the kids pizza, and they stopping running around for about 5 mins to eat. (I will call that a success).

The crust was hearty and wheaty, but not overbearingly so. It had a nice crumb, with a good crisp and chew. I would definitely repeat this pizza dough, but would use an longer ferment time for the dough, rather than a same day dough.

Basic Flour (for Oxtail Potato Gnocchi)

It took a dish of potato gnocchi and braised oxtail to make me want to create and write about basic flour. For the fourth meeting of a cookbook club, the host choose Tasting Rome. After a bit of neglect, I thought this was the time to dust off the mill and make some flour. There was no need for anything other than an “all-purpose” flour for my chosen recipe of coda alla vaccinara con gnocchi di patate. This made me think about the value of fresh-milled flour for these secondary uses.  Unlike when used in fresh pasta or bread, is it worth it here? I didn’t run a side-by-side comparison for these gnocchi, but I think that any time an ingredient adds to a dish, rather than just take up space (or supply needed gluten), it brings out a more complete flavor and makes food that sits better on the palate.

What I decided to go with was just a simple flour from Red Fife, a versatile and wheaty wheat. Either emmer or einkorn may have been better for a more rustic old-world flavor, but my granary has been depleted from neglect and didn’t have any in stock. Really though, I wanted to just make a standard basic flour. Potato gnocchi is about texture and weight, not flour. However, I think that flesh milled and bolted flour has a place even when flour is not the highlighted ingredient.

With extra for dusting and storage, I needed just a bit over 1 1/2 cups (roughly 180 grams) of flour for this recipe. Working backwards from previous extraction ratios, I started with 560 grams of Red Fife berries.

Making a fine flour results in a lot of by-product. Pictured below is the bran, everything that won’t pass through a #40 mesh sieve, and the middlings, the rest that doesn’t pass through a #80 mesh sieve. I find that #80 mesh is the minimum size screen for a true fine flour.

This basic fine red fife flour is a 33% extraction (although I was a little inefficient and milled a click coarser than my normal setting when making fine flour).

IMG_20180923_155653
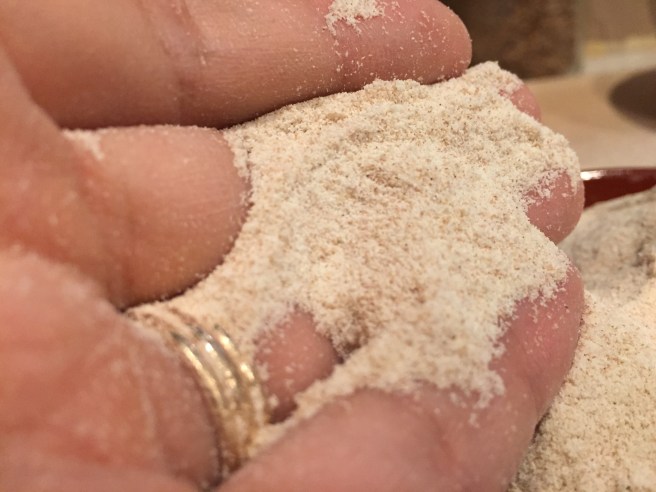
Fine fresh-milled flour has a rich white color and a soft vegatal flavor. It doesn’t taste like much compared to a fresh ripe tomato, but it tastes like actual food compare to commercial flour.

To get back to flour, I need to get back to the basics.

Because you can really only take so many pictures of flour, here are some cooking photos. Braised anything makes for great pictures.  I have never made potato gnocchi before and was worried about creating dense gummy little balls, but they ended up pretty good, light and airy. The potatoes could have used a couple more minutes, as they were just a touch under-cooked. The flour didn’t shine though, but I believe it helped make them taste rich and complete even as a barely dressed dumpling (which some of the kids at the party wanted).

MVIMG_20180923_160813
boiled whole, skin on, then grated (no ricer)

The basic recipe (from the cookbook) was 1 lb of dry floury-type potatoes (in this case russets), 1 1/3 cups flour, a pinch of sea salt and fresh ground nutmeg. Just like for fresh pasta, form a well with the grated potatoes, add the flour/salt/nutmeg mixture to the well, and then knead until it is all just incorporated together and forms a soft dough.

IMG_20180923_161759
potato dough–needs to rest for a while

I wish I had taken a photo, but my daughter helped cut up the gnocchi. Despite her later resistance to eating anything (playing was more fun), she loves to be part of the cooking process. We cut roughly 1/2 inch squares off the rolled out potato dough snake, keeping the dumplings on the larger size to hold up better when mixed with a thick braised oxtail stew.

IMG_20180923_171236
packaged for transport to the party

The recipe for the braised oxtail is simple and beautiful. I deviated in minor bits from the cookbook (part of the spirit of the club is to not deviate too far), mainly because I wanted to create the ragu straightaway (skipping the eating off the bone standalone dish), as the cookbook suggested is good as leftovers when mixed with the potato gnocchi. It was.

Sonora Wheat: Tacos with Puya Chile Sauce

It was time again to make tortillas out of white Sonora wheat. This hard white wheat is good for a lot of uses and by far my favorite for non-bread or pasta purposes. It has a very clean, slightly sweeter, and less wheaty favor that is just really enjoyable.

While my previous tortillas were good, I still felt the flour was too rough and hampering the creation of a smooth and pliable tortilla. My last batch was at a 75% extraction and I decided to bring it down to 50% (from the whole grain). Based on this batch, I think this is just about right.

From 300 grams of whole white Sonora wheat berries, I milled out:

  • 105 grams of fine flour (through an #80 mesh)
  • 120 grams of class b middlings (through a #40 mesh, but not the #80)

I added 45 grams of the class b back to the fine flour to get a blend at the target 50% extraction.

Dough recipe:

  • 150 grams
  • 25 grams lard
  • 10 grams sunflower oil
  • 75 grams warm water
  • 1/4 tps sea salt

To build up some strong gluten, I gave the dough a good workout after first letting it rest for 15 mins just after mixing together. The tortillas all came out very nice. I still think they are a ways from amazing, but getting better. The dough was stretchy and more chewy than flaky.

Mini dough balls, 16 in total of around 15 grams each for small taco size tortillas:

20170716_184852

20170716_190014

Not over cooking, but still getting a little color is key:

20170716_191230

I still struggle to roll out a nice round tortilla. I can get it started as beautifully round, but it always looses its shape as a get it thinner.

Final product:

Everything in the tacos was made completely from scratch. The tortillas, obviously. The refried beans, chopped red onions and cilantro, a little guacamole, and a puya chile sauce (one of my new favorite chiles). Actually, the sour cream is from the store though. I like making my own crema, but it takes a day of planning and that just often doesn’t happen around my house.

20170716_201621

New Sifter Day

It was past time to upgrade by baseline sifter, so I finally got myself a new fancy scientific grade #40 mesh sieve. This is going to replace my old cheap over-sized #50 mesh sifter (although it wasn’t truly rated, just marketed as a #50 mesh online). This #40 mesh will let flour particles smaller than 425 microns (.0165 inches) through. For comparison, my #120 mesh sieve sorts flour down to 125 microns (.0049 inches)–a lot of work but makes for an incredibly fine flour that is fun to make dough with.

Besides just for the sake of having a nice piece of equipment, this sifter is step one in my new plan to get back into bread making using straight flour. Straight flour means the whole grain with the bran and some germ removed, typically a 75% extraction. I think this #40 mesh is about right to get the extraction ratio I am looking for. A test run seems to bear this out, but I have to try with slight variations in the grind setting on the mill and different wheat berries.

40mesh sifter

making cavatelli from fresh milled durum

A few days ago I ate at what is considered one of best Italian restaurants in Seattle (of a short list). They had cavatelli with duck ragu as a special and, knowing that I had my cavatelli on the home pasta schedule, it was a perfect opportunity to get a comparison. As an aside, it was nice to see a restaurant serving pasta as a proper first (primi) course and not as a main dish. I am not going to go all Big Night on people, but it bothers me that so many otherwise good Italian restaurants serve pasta almost exclusively as a main course.

The restaurant’s cavatelli dish was excellent, however, the actual pasta was not really noteworthy. It carried the sauce, but the flour in the pasta had no distinct flavor. This is not a criticism of the restaurant or chef, it is just the state of flour. Flour is ignored. I suspect great care was taken in sourcing every other ingredient in that dish.

Which brings me to my cavatelli. My gnocchi/cavatelli board arrived in the mail and I wanted to waste no time.

For the milling, I tried a slightly modified semolina milling technique, but the end result turned out less efficient. It was still a three-step grinding  and sifting process, but instead of only removing the fine flour before re-grinding, I took out all the fine semolina as well. It just seemed a little more efficient, but it ultimately resulted in less fine semolina as a percentage of starting grain. I also realize that I definitely need new sifters to better sort semolina, particular a lower # mesh. After this cavatelli experiment, it is going to be on the home menu pretty regularly and it will pay off to get this slightly more refined.

Pictured below is the product of the first rough milling. Final breakdown of 515 grams of durum wheat berries–90 grams durum flour, 130 grams fine semolina, and 285 grams coarse semolina (~10 grams of bran extract).

20170312_153030

Cavatelli is a traditional semolina dough and very simple. Dough recipe:

  • 250 grams durum (composed of 130g fine semolina, 20g durum flour, 100g coarse semolina).
  • 125 grams water
  • small pinch of ancient sea salt
  • light drizzle of olive oil

The dough was well-kneaded until it formed a smooth and soft pliable ball. The gluten in durum is strong but short and will not be as flexible as regular wheat gluten.

20170312_161418

IMG_0846After resting the dough for an hour or so, I cut it in quarters and rolled out pasta dough snakes. This is probably the most fun you can have making pasta.

I first learned this technique sometime around kindergarten age, when it was still acceptable to make ash trays from clay in art class.

20170312_181337

The cavatelli is made by cutting little squares off the dough snake, which are then pressed with your thumb over the gnocchi board with a rolling motion to make little ridged pasta dumplings.

This slideshow requires JavaScript.

IMG_20170313_001505_139

Next time I will make them slightly longer and thinner, but only just a bit. The shape ended up pretty close to how I envisioned.

Final pasta dish: Cabbage braised in a little red wine and garlic, sauteed mushrooms, and speck (smoked prosciutto-like ham).

20170312_185659

There was a slight coarseness to the texture and maybe a too al dente cook, but it was very delicious. My daughter isn’t exactly a tough pasta critic, but she was clearly a fan.

more pasta: durum semolina

When I was a teenager all I wanted to eat was pasta. My mom got so sick of my brother and I always wanting pasta that she threatened to make pasta and nothing else until we broke down and begged for anything else. Nonstop pasta lasted about two weeks, until my mom couldn’t take it anymore. To this day, when I go back home to visit she doesn’t even have to ask what I want for dinner when I get there (it’s baked ziti or nothing).

And now that I have some new durum to experiment with, my own pasta streak will continue for the foreseeable future. I think the next will be cavatelli, a classic homemade semolina pasta. For this first durum test, however, I wanted to see if I could make a semolina flat noodle. Results were mixed.

Compared to Kamut, durum berries have a similar color, but are considerably smaller. Durum is picture below on the left, with Kamut on the right. I milled the durum using the my same three step semolina process, with 600 grams of durum resulting in:

  • 125 grams of durum flour (passed through the #80 mesh)
  • 195 grams of fine semolina
  • 285 grams of coarse semolina (with some bran removed)

For the dough, I used the most basic recipe:

  • 280 grams of semolina (which included 190g of fine semolina, 10g of durum flour and 70g of the coarse semolina).
  • 140 grams of water.

The dough was mixed and well-kneaded into a firm smooth ball, then left to rest for 1 1/2 hours before rolling into flat sheets. I rolled the dough to the third narrowest setting on the rolling machine.


20170219_191206

I was more interested in testing out the durum semolina than the actual final pasta dish, so the noodle cutting was sort of a random crinkle-cut wide flat noodle. The noodles were good although somewhat non-distinct in flavor. Kamut definitely has a more pronounced hearty butternut type essence. This durum was more a plain light flavor. The noodles had a firm texture, but didn’t hold up as a long noodle. I am not entirely sure what the issue was. My wife thought they were better than I did, so they had that going for them.

20170219_223830


Fresh Milled Kamut/Turkey Red Tagliatelle

My first order of Durum wheat berries arrived earlier this week. I am looking forward to comparing them against the Kamut that I have been using for pasta. Until then (hopefully soon), I recently tried a blend of Kamut and Turkey Red to make a variation on a standard egg noodle tagliatelle.  This was also a chance to test out my new KitchenAid pasta roller attachment.

20170128_193942

First the flour milling (the part this blog is actually about). My Kamut experiments have helped me refine the process of separating the milled Kamut into flour, fine semolina, and coarse semolina. It is a somewhat time-consuming three stage milling and sifting process.

First, I crack the Kamut berries using a wide (coarse) setting on the mill and sift off all resulting flour with an #80 mesh sieve. The coarse ground Kamut goes back through the mill at a medium setting. I repeat the sifting and grinding again at a fine setting. After the third milling, I sift out fine semolina with a #50 mesh sieve from everything that didn’t make it though the #80 mesh. The last step to extract the coarse semolina is a manual process of shaking and carefully scooping off the bigger lighter pieces of bran that float to the top. Then result by percentage is roughly 25% fine flour, 37% fine semolina, and 25% coarse semolina.

As crazy as my wife will think it is, I want to get two new sieves to further refine this process–with a #60 mesh and a #40 mesh, so that my fine semolina is between an #80 and #60 and the coarse semolina is between the #60 and #40 (although maybe #30 would be better).

20170128_132403
Kamut flour with its light yellow color

img_0373

I also milled some Turkey Red using a very fine mill setting and bolted out the fine flour with my #80 mesh sieve (a 35% extraction).

The noodle dough started as a standard egg noodles recipe, but I decided to add more water and slightly less egg. I wanted to try a mix of a water-based semolina dough and egg flour noodle.

Recipe: 215 grams of 50/50 blend of Kamut fine semolina (and some Kamut flour) / Turkey Red fine flour ; 1 whole egg plus 1 yolk; 1 tbls olive oil; and a fair bit of water until the dough came together.

img_0379


Fresh flour tends to take more water, so having to keep sprinkling in more was not a total surprise. In the end, there was too much water for that much flour (rather than semolina).

img_0384
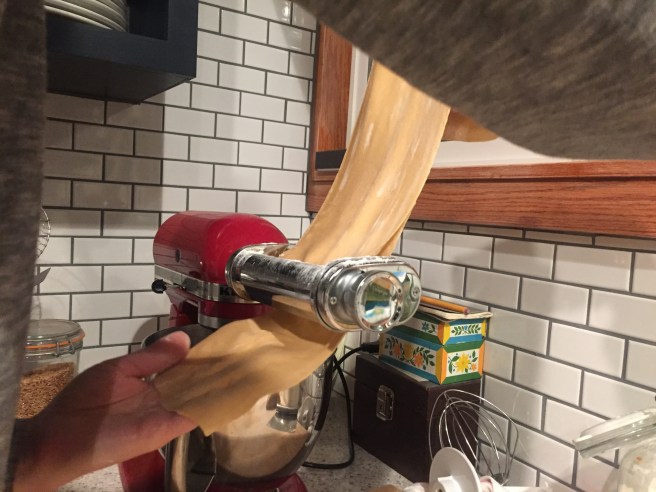
Rolling with the KitchenAid attachment is so much easier than my old counter-(poorly)mounted hand-cranked roller, which I tossed unceremoniously in a fit of meh one day. This is definitely going to help my long flat noodles and stuffed pasta skills. I love to hand roll pasta and won’t give that up, but this is a nice tool to have.

You can see in the picture the dark earthy look of the dough. It amazes me that even this bolted flour (of fairly low extraction ratio), which looks pretty similar to commercial white all-purpose, results in dough with a much darker and richer color (and with a wheaty flavor you just don’t get from non-fresh flour).

img_0380

The final product was just so-so, partially because I rolled the dough one level too thin (got carried away be the ease of the new power roller). As a result, the noodles just didn’t have any bite to them. Flavor was not bad, but not a blend of flour or recipe I would use again. As is often the case, the pasta was dressed with a very simple tomato sauce that my wife made. There were plans for a more complex dish, but some version of this sauce is a staple in our house and is the default when time runs short. You can see in the photo that the noodles were too thin and flimsy.

20170131_190816

20170131_191130
nice pasta technique

My daughter loved it though. She hasn’t developed an appreciation for al dente yet.


Kamut Orecchiette

Without really meaning to, I took a break from posting about my adventures in home flour milling. I wish there were some interesting or meaningful reason, but it was just being busy. The whole-purpose mill didn’t shutdown over the past six months though, the milling and sifting continued (albeit at a more infrequent pace).

Over in Spokane for the holidays, I picked up some Kamut berries to go along with my Christmas present of a KitchenAid pasta rolling attachment. I have yet to find a source of true durum wheat berries and I find Kamut a good alternative for durum-based pastas. Kamut is a brand name of khorasan wheat, a cousin or ancestor of durum.

Kamut is a tough berry that is about twice as large as your normal wheat berry. For grinding a semolina, I will do a coarse grind first to break it up. Making semolina is more of a staged process than any of the other flours that I make.

After the first rough milling: 20170114_175131

I sifted out the fine semolina and flour that resulted from the first milling and sent the rest back through at a finer grind setting (a course-fine grind). The final product broke down into three grades after sifting, with 170g of bran/germ extracted:

  • 70g of b grade semolina (passed through a general medium fine mesh sieve)
  • 70g of fine semolina (passed trough a #50 mesh sieve, but wouldn’t make it through an #80 mesh)
  • 45g of fine Kamut flour (passed through a #80 mesh). #80 mesh is the the lowest sieve that I consider makes a fine flour. I might try a #70 though to see if that changes much while enabling me to keep a little more flour.

Pictured below, from left to right in order of fineness.

20170114_180440

The fine semolina was a really nice consistent grind with a great rich yellow color. 20170114_182402

For making pasta, however, the separation of the grades was just temporary for testing purposes. The final blend was 200g of semolina and flour, a mix of all the grades listed above, plus a touch of the bran/germ extract. I added 120g of cool water, mixed by hand, and kneaded into a firm smooth ball with good spring-back. The dough was then wrapped and left to rest.

Dinner was poorly planned, as usual for me, so the dough ball did not rest long enough. It should have been 1-2 hours, but it got only 45 mins, which did result in the dough feeling unfinished and not staying as smooth as it should have.

Given the short time of resting for the dough, using the KitchenAid to roll out the dough didn’t seem wise, so I decided to make orecchiette instead. Orecchiette is supposed to a rustic homemade pasta anyway, so it fits for the occasion. Orecchiette also has the benefit of being made with a blend of semolina and flour.

After resting the dough (for not long enough), I rolled it out and made about 10 dough snakes in classic elementary school fashion. I used a butter knife to cut off off-set square pieces and roll them into ovals and turn them inside-out. It is a little bit of a slow process, but you have to just keep a steady rhythm and not get overly concerned about exact consistency (my wife would probably have killed me if I delayed dinner any longer as well).

I thought my rolling and turning work turned out OK for a orecchiette novice. I watched this video of Nonna Romana as my guide.20170114_193703

My daughter was eyeing the pasta as I started to plate, she does love her pasta.

20170114_195138
finished orecchiette being spied upon

The pasta turned out pretty solid and enjoyable. My wife liked the wheatiness of the Kamut that came through in the pasta. That is the best part about using fresh flour, getting the taste of actual wheat in your food.

The sauce was a very simple, with garlic sauteed in oil olive, crushed San Marzano tomatoes, chopped olives and a touch of dried herbs (marjoram and thyme). Grated parmigiano-reggiano on top. Credit to my wife who actually made the sauce.

Superfine Red

I’m back to pizza dough. My last attempt was a spelt crust that turned out OK. What I really want though is a flour more in line with an Italian Tipo 00 that makes a classic pizza dough, with real bite and a little (but not too much) chewiness. Red fife is still my favorite flour at the moment, so I thought I would see how it holds up as pizza.

Pictured below: red fife berries, whole grain flour, 76% extraction “straight” flour, and finally, the superfine red, a 30% extraction. My #120 mesh sieve actually results in a little lower % extraction for the red fife, but I added back a little of the class b clear flour to get the even 30%. Not pictured is the middlings and clear flour. The milling started with 560g of red fife berries, resulting in (rounded):

  • 140g of bran
  • 175g middlings
  • 75g clear (what I would call class b)
  • 170g superfine red

IMG_7251


The superfine red has the look and texture of a pure powder. It also has a great clumpy properties. It is a lot of work to get through the sieve, but I am becoming more efficient with a couple different brushing and shaking techniques. Keeping the sieve clean and the mesh openings free of particles is also essential. IMG_7245

Contrast this with the middlings, which is more like a fine meal.

IMG_7250

For the dough, I started with an overnight pre-ferment (using King Arthur All-Purpose).

  • 200g pre-ferment (100g flour/100g water/sprinkling of yeast)
  • 170g superfine red
  • 75g water (total hydration 65%, counting pre-ferment)
  • 5g sea salt
  • a gram or so of yeast

Cooking a pizza is still a major shortcoming of my kitchen (same with breads in general), so I stuck with a pan-style pizza. The dough was very elastic and workable. An incredible even and smooth texture. I think the hydration was too high though. I should have lowered my water ratio to account for the fineness of the flour. It just needs less water.

The final product: Pepperoni (here salami instead, to keep it fancy) and mushroom will forever be my favorite kind of pizza. My wife likes a simple medley of onions, zucchinis, and bell peppers. The sauce is just strained tomato sauce with garlic sauteed in olive oil, dried oregano, and red chili flakes. The pizza was broiled on high, after pre-heating to 400 degrees (it should have been hotter).

I will admit that I messed up the execution a little. You can’t see it, but the crust was not crusty on the bottom and I had to carefully transfer it to a mesh rack for a little extra baking time, which wasn’t ideal. The over hydration of the dough is probably partially to blame. In the end, the crust was very good though. The best part about the superfine red is that it really retains a lot of the depth of whole wheat flavor, without the heavy rustic taste and texture of whole or high-extraction flour. This is a just a really great flour that I plan to keep working on to get a little more fined tuned for different applications. IMG_7291

**